Thursday, June 30, 2011

Day 32

Today we fashioned some rough pebbles into smooth, beautifully polished stones. The best stones to use are relatively low on the Mohs scale of hardness such as soapstone (2), and serpentine (2.5). If you can scratch the stone with a piece of steel it should be soft enough to work with. You do not want a stone that is too soft though such as talc (1 on the Mohs scale) because it may break apart.

To work with stone it will help to have a machine. We used the "Inland Swamp Top All-In-Wonder Lapidary Machine." It is a basic wet saw as would be used to cut tile but the top flips over and different attachments can be added for different purposes. From the middle ages up until the industrial revolution slabbing and polishing wheels were powered by water wheels in rivers. In Vermont, marble, slate, and granite are abundant and have been mined from the hills for hundreds of years. In fact, the first marble quarry in the United States was on Mount Aeolus overlooking East Dorset, Vt. Here is a description by Ronald Robinson of the marble quarries of Vermont in 1890:
"In the great pits, yawning wider and deeper every year, men and engines, in sunshine and in storm, delve all the seasons through. When the landscape is bright under the summer sun they may be seen, like ants toiling in their cells, hundreds of feet below the surface. Now and then an ant grows into a burly, grimy man, climbing the giddy stairs; or a small watercarrier, bearing, with careful steps, his heavy bucket to the thirsty workmen..."

The uses for polished stone are wide and varied. One could make soapstone chess pieces, obsidian arrow/spear/axe heads, obsidian scalpel edges such as the Incas used for surgery, inlays for belts/staffs/knife handles, mosaics, jewelry, paper weights, decorations, the list goes on. Today we just made some nice polished stones that can be altered further for various purposes. Here is how to do it.

After you select your stone, examine it to find what part of it you think will look best. You may want to check for cracks and faults as well to help determine which parts you would like to eliminate. The first step is to shape your stone using the diamond trim saw. Remove the top of the machine and set the blade in. Make sure to secure the arbor nut and note that like a table saw, it is tightened using a left hand thread. The trim saw will essentially achieve "slabbing" on a micro scale. Fill the water reservoir of the machine and connect the drain hose to a waste bucket. Set the drip valve to have 1 or 2 drops every second falling onto the blade. Turn the machine on, wet the stone, and slowly feed the stone into the blade. The blade should begin to cut through the stone and you should notice water and stone dust draining out the tube into the waste bucket. You can continue cutting through the stone at different angles until you achieve your desired slab trim. Depending on your stone, you may start to notice some nice colors and patterns in the interior of the stone. If the saw starts to struggle you may need to push less hard, turn the RPM's up or down, or apply more water to the stone and blade.


Next you will need to take off the top of the machine and remove the trim saw with an Allen key. Attach the edger/grinder/shaper tool. Use this tool to remove or add corners and further refine the shape of your stone. This tool uses the opposite side of the top facing up as a water reservoir and a guard.


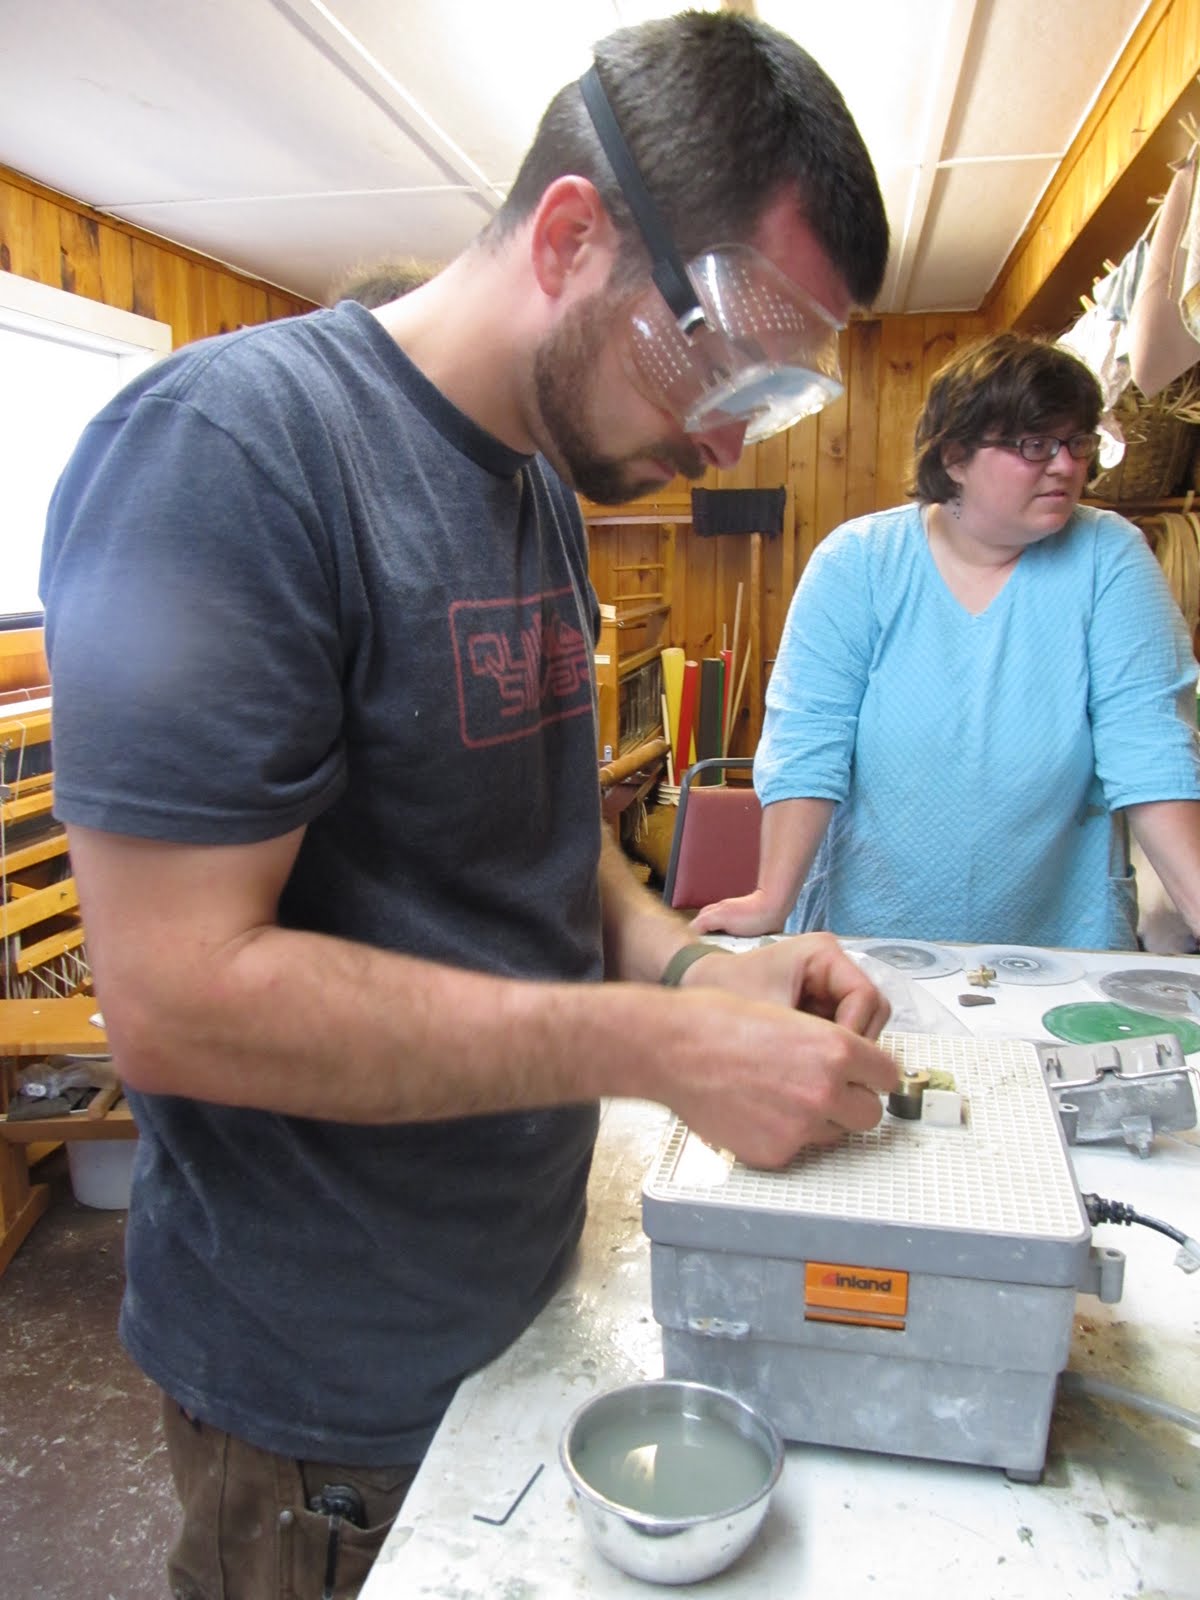
Next remove the edger/grinder/shaper and attach the 6" "master lap" which is a white plastic disc. Set the lap horizontally and allow it to touch the plastic below it and then lift it up just a scoce and secure with the Allen key. This lap will give stability to your polishing laps. Begin with a 325 grit lap (coarse grain) and attach it to your master lap. Next setup your dop station. It is an electrical heating element that had a reservoir for wax and shlack. Melt some wax in the reservoir and heat your stone on the edge. Use a small dowel and dip it in the wax. Place the wax tip on a side of the stone that you are not going to polish and press the wax down with your fingers to secure the dowel to the stone. The dowel will be your handle to keep your hands safe while polishing. Hold the dowel, wet your stone and apply it to the spinning lap at different angles. Turn the stone around to grind away divots and other imperfections. Repeat this process using 600, 1200 and finally 14,000 grain lap. Note that the finer the grain the faster the RPM's should be. During the last lap which is the polishing phase, the stone should be dry. You will begin to see a nice sheen develop on the stone that can make it appear almost precious. If you want to polish the side that the dop is attached to, freeze the dop stone and wax and the wax should break off very easily. Apply the dop to the already polished side and finish the job. The result might just surprise you with its brilliance.

The dop station with wax and rocks heating


Dop applied to stone


Using the dop stick to polish a stone


Some finished stones shining with brilliance!

Day 31

Today Jacob and I removed our T-shirts from the plant dye after 3 days of soaking. We used Genista tinctoria, known as Dyer's Greenwood and also called Woadwaxen. It boils to a beautiful yellow color that really takes well to a T-shirt. Mine was originally an off-white color with a green pattern painted on it. It looks a lot better now with the contrast between the green and yellow. I am going to have to dye more shirts using Dyer's Greenwood and other plants. T-shirt is too boring? No problem, boil some plants and add some color! I might have to try a natural tie-dye shirt. That would be really fun.

Here's the shirt with a sprig of Dyer's Greenwood on it.


Then I saw some sweet license plates


Followed by a garden on a roof


And Dick Richie waking up from a nap

Tuesday, June 28, 2011

Day 30

This morning didn't go so well. Tractors ended up being a bit problematic so we called it a day earlier than usual. Later I helped slaughter the broiler chickens. They're a heritage breed so they're all brown instead of white like the others. The brown ones can also stand up for a lot longer because they only weigh 3-4 pounds whereas the white ones weighed 6-8 pounds so they could barely support their own body weight. This means the white ones spend a lot of time sitting in their own droppings. Slaughtering lighter, cleaner chickens ended up being a lot easier. The other thing that made it easy was the plucking machine we borrowed from a farm down the road. You dip the chickens in hot water to loosen the feathers then throw a couple into the drum. The drum spins around and rotates the chicken against rubber fingers that pull the feathers away while shooting water at them to wash the feathers down a drain. It works pretty good.

Here's me driving the baler about to clog it


Here's the plucking drum in action


"Woe betide any man who depends on the abstract humanity of another for his food and protection." - Michael Ignatieff, 1984

Monday, June 27, 2011

Day 29

Today was a good day. The sun was shining for the first time since maybe, I don't know, Thursday? As I was heading to Intro to Grazing the sun was cutting through the last of the moisture and burning it off with searing shafts of light.


Then I saw the strangest thing. There was a rainbow across the sky that was entirely devoid of color. It looked like a cloud arch stretching across the farm.


Later I saw a couple of neat spider webs


In Farmstead Arts we boiled down some plants to use for dyes. It works pretty good. I don't feel like explaining the process at the moment but perhaps later I will.

Sunday, June 26, 2011

Day 27 & 28

Dane was here this weekend and it was awesome. He got here Friday night after dinner and gifted me an ashtray from Ken that is made out of a NH license plate. It's pretty awesome. Friday night we went to a combination going away party for Bianca and birthday party for Tim. My contribution was some blackberry currant mead that I bought from the not quite opened yet Caledonia Spirits in Hartwick. At the party I questioned Lee about his School of Forgotten Arts project. I was looking for an impromptu demonstration and that's exactly what he gave me. The man lit my cigarette using two sticks, neither of which was a match. I am going to have to get a basswood plank and spindle and start carrying them around. Next time someone asks me for a lighter I will hand them the wood and watch in amusement as they stare at me with a perplexed look of 'what the hell am I supposed to do with this?'

Saturday morning we went to the store for some freshly made breakfast wraps and had a little chat with John Dunbar's grandfather. He is an amusing fellow. Next we visited the Sterling Farm to see the animals and do a little scything. After that we took a trip to the Rock Art Brewery in Morrisville. We tried 4 brews at the sampling bar and ended up going with 64oz Growler jugs of IPA. On the way back we stopped by a very friendly, well-stocked gun shop in Hartwick. When we got back we watched the rain roll in over the mountains at the sunset spot and talked with Stuart about the farm. Saturday night was the planned time for Dane to play but something about the weather just didn't seem right so we went to the corner house for a jam with Dane on guitar, Trevor on bass and John Belcher on mandolin. Later that night we watched Charles and Brian Clift pound railroad spikes into crude knives at the Sterling Blacksmithing forge.

On Sunday we went down to the store and hung around on the bench for an hour or so chatting it up with the locals. After that we went to the Dunbar Farm to see John's homemade knives. His best skill so far has to be his handles. One design involves the tang going through the middle of stacked discs of ironwood, leather, and part of a schlitz beer can. Sunday night Dane played a very well received acoustic set during dinner. The comments from the staff and students alike were that his guitar playing is phenomenal and his voice is even better. His presence was much appreciated. All around it was one of the better weekends I've had here.

El Arte de Dane


Friday, June 24, 2011

Sterling Day 26

Went on some farm visits today. Here's some pics.


Sterling Day 25

Today we made some "Good Farm Hands" beeswax salve in Farmstead Arts. It is very easy to do. All you need is a hunk of bee's wax, some olive oil or other oil, and some essential oils. You take the bee's wax and cut it up into chunks, throw the chunks in a pot and melt them down to a liquid. Heat up some olive oil at the same time. When they're both hot mix together at a ratio of 3 parts oil to 1 part bee's wax and stir it up nice and good. Have some warmed jars handy to ladle the concoction into. When you get the stuff in your jar put in a few drops of distilled oil such as orange or peppermint to give it a nice scent. You can also not use oils and it will still smell pretty good. Mix it around in the jar a little and cap it. After a few minutes the mixture will reach room temperature and solidify into what looks like a jar of chap stick. it is good for dry cracked hands, blisters, lips, and whatever else needs some love.

Chopping up the wax


Don't get wax on your forehead it makes you go crazy


Melting down the wax


Mixing the oil and wax


Filling the jar


Adding essence of orange


Left jar is still cooling, right jar is done


At night I went to go visit our petting zoo - I mean the farm rather


Wednesday, June 22, 2011

Sterling Day 24

Today we went to Vermont Compost in Montpelier for a Livestock Systems field trip. Best field trip ever. I met "The most interesting man in the world." VT Compost sells high quality humus to VT, New England, Wisconsin, Illinois, Indiana, Ohio, Canada...they're a serious operation.


Yep, pretty sure this man drinks Dos Equis